- Get link
- X
- Other Apps
Brief
The most ideal approach to recognize the objective value is to distinguish the Support and the Resistance Level. The support and resistance (S&R) are explicit value focuses on a graph which is relied upon to draw in most extreme measure of either purchasing or selling. The support level is a cost at which one can anticipate a bigger number of purchasers than sellers. Moreover, the resistance level is a cost at which one can anticipate a greater number of sellers than purchasers.
On an independent premise, brokers can utilize S&R to distinguish exchange passage focuses also.
Meaning of 'Resistance'
As the name recommends, resistance is something that prevents the cost from rising further (or you can say a value level from where the stock bounce back. The resistance level is a valuable point on the diagram where dealers anticipate most extreme gracefully (as far as selling) for the stock/file. The resistance level is consistently over the present market cost.
The possible hood of the value ascending to the resistance level, merging, engrossing all the gracefully, and afterward declining is high. The support is one of the basic specialized investigation apparatus which advertise members take a gander in a rising business sector. The resistance level act as a trigger to sell.
Here is the graph of ABC Limited. The even line harmonizing at Rs.215 on the diagram denotes the resistance level for ABC LTD

I have intentionally picked the graph to incorporate more information focuses, the purposes behind which I will in no time clarify. Be that as it may, before that there are two things that you have to focus on while taking a gander at the above diagram:
1.The resistance level showed by an even line, is higher than the present market price.
2.While the resistance level is at 215, the present flame is at 206.75. The present flame and its relating value level are surrounded for your reference
For a second let us envision ABC LTD concretes at Rs.206 shaping a bullish marubuzo with a low of 202. We realize this is a sign to start a long exchange, and we additionally realize that the stop loss for this exchange is at 202. With the freshly discovered information on obstruction, we currently realize that we can set 215 as a potential objective for this exchange!
Why 215 you may -wonder? The reasons are straightforward:-
- The resistance of 215 suggests there is a probability excess supply
- Selling pressure is build due to excess supply
- Selling Pressure (Exiting their current position) drag down the current market price
Henceforth for reasons expressed above, when a trader is long he can see resistance focuses to set targets and to set leave focuses for the exchange.
Additionally, with the ID of the resistance the long exchange would now be able to be planned as follows:
Entry Point – 206, Stoploss Point – 202, and Target Point – 215.
The following clear inquiry is how would we distinguish the resistance level? Recognizing value focuses as either a help or opposition is amazingly basic. The recognizable proof procedure is the equivalent of both help and opposition. On the off chance that the present market cost is beneath the recognized point, it is known as an resistance point; else it is known as a support point.
Since the procedure is the equivalent, let us continue to get 'Support', and we will line it up with the strategy to distinguish S&R.
Meaning of 'Support'
Having found out about Resistance, understanding the help level ought to be very straightforward and instinctive. As the name proposes, support is something that keeps the market price from falling further. The support level is a valuable point on the outline where the dealer anticipates the most extreme interest (as far as purchasing) coming into the stock/file. At whatever point the value tumbles to the supportline, it is probably going to skip back. The support level is consistently beneath the present market price.
There is a most extreme likely hood that the price could fall till the support, unite, ingest all the interest, and afterward begin to move upwards. The help is one of the basic specialized level market members search for in a falling business sector. The help frequently goes about as a trigger to purchase.
- Support at 435 suggests there is a greatest likely hood of an overabundance of demand
- Purchasing pressure is build due to excess demand
- Purchasing constrain will in general drag the price higher
Here is the diagram of XYZ Limited. The flat line corresponding at 435 on the graph denotes the support level for XYZ Limited.
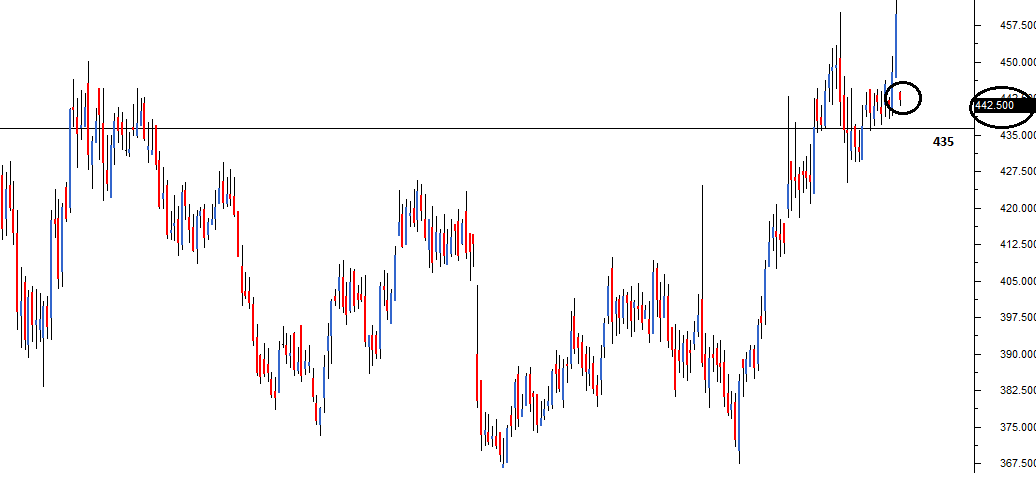
Scarcely any things that you have to see on the outline above:
The support level showed by the flat line is underneath the present market price
While the support level is at 435, the present price is at 442.5. The present flame and its relating value level are circled for your reference
As we did while getting resistance, let us envision a bearish example – maybe a shooting star at 442 with a high of 446. Obviously, with a falling star, the call is too short XYZ Limited at 442, with 446 as the stop-loss. Since we know 435 of the quick help, we can set the objective at 435.
So what makes Rs.435 target commendable? The accompanying reasons back the choice:
Consequently for the reasons expressed above, when a merchant is short, he can see bolster focuses to set targets and to set leave focuses for the exchange.
Likewise, with the recognizable proof of the help, the short exchange is currently totally structured.
Entry Point – 442, Stop Loss Point – 446, and Target Point – 435.
Drawing/Construction of the Support and Resistance level
Here is a 4 stage manual to assist you with seeing how to recognize and build the Support and the Resistance line.
Stage 1) Load information Point – If the goal is to distinguish present moment S&R load at any rate 3-6 months of information focuses. On the off chance that you need to distinguish long term S&R, load at any rate 12 – year and a half of information focuses. At the point when you load numerous information focuses, the graph looks compact. This additionally clarifies why the over two outlines look pressed.
Long term Support & Resistance – is valuable for swing-trading
Short term Support & Resistance – is helpful intraday and BTST trading
Here is where I have stacked a year of information focuses
Step 2) Identify at least 3 price action zones – A price action zone can be described as ‘sticky points’ on chart where the price has displayed at least one of the behaviors:
- Hesitated to move up further after a brief up move
- Hesitated to move down further after a brief down move
- Sharp reversals at particular price point
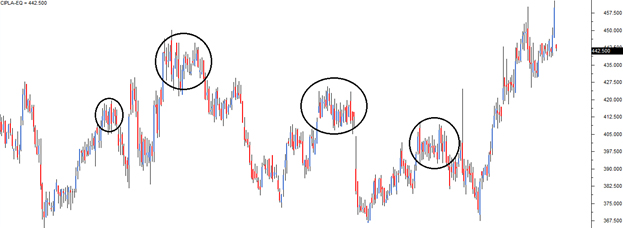
Here are a series of charts that identifies the above 3 points in the same order:
In the chart below, the encircled points indicate the price hesitating to move up further after a brief up move:

In the chart below, the encircled points indicate the price hesitating to move down further after a brief down move:
In the chart below, the encircled points indicate sharp price reversals:
Step 3) Align the price action zones – When you look at a 12 month chart, it is common to spot many price action zones. But the trick is to identify at least 3 price action zones that are at the same price level.
For example here is a chart where two price action zones are identified but they are not at the same price point.

Look at the following chart, I have encircled 3 price action zones that are around the same price points:
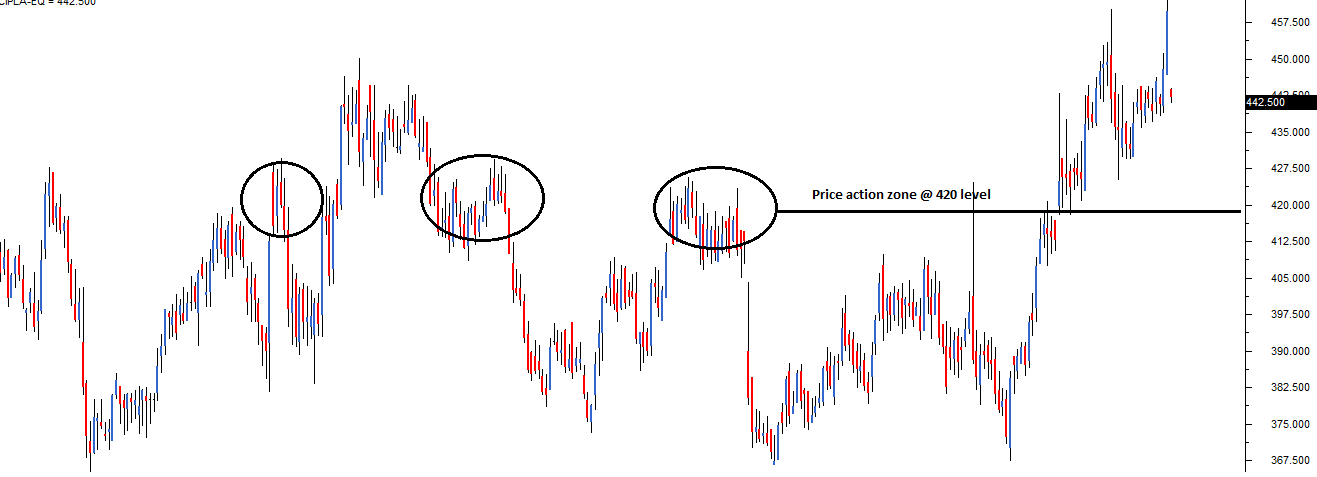
A very important point to note while identifying these price action zones is to make sure these price zone are well spaced in time. Meaning, if the 1st price action zone is identified on 2nd week on May, then it will be meaningful to identify the 2nd price action zone at any point after 4th week of May (well spaced in time). The more distance between two price action zones, the more powerful is the S&R identification.
Step 4) Fit a horizontal line – Connect the three price action zones with a horizontal line. Based on where this line fits in with respect to the current market price, it either becomes a support or resistance.
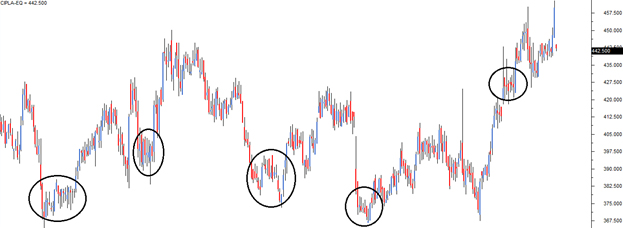
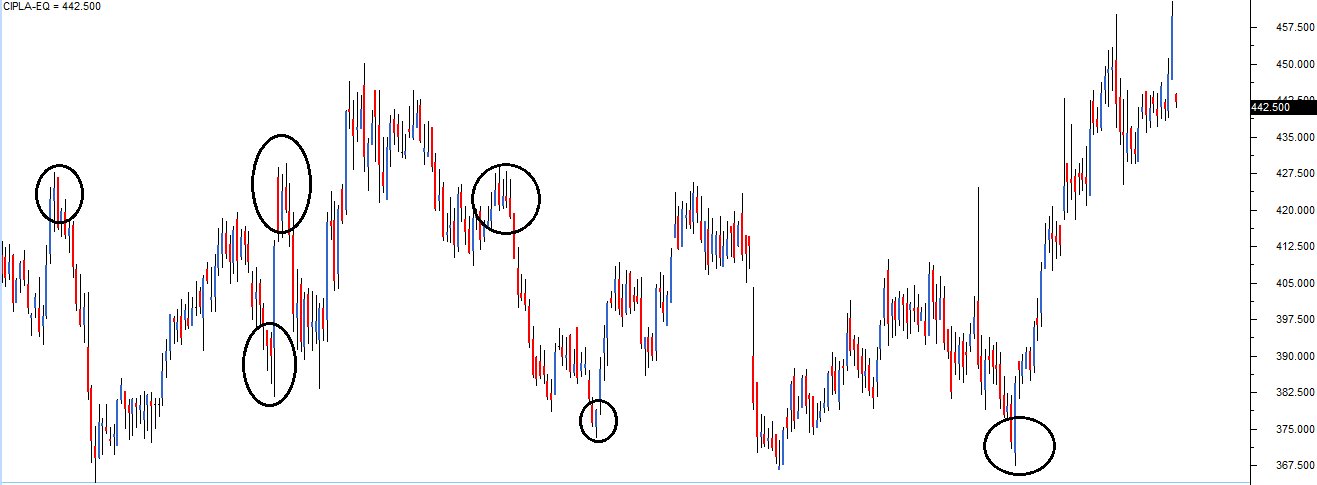
Have a look at this chart

Starting from left:
- The 1st circle highlights a price action zone where there is a sharp reversal of price
- The 2nd circle highlights a price action zone where price is sticky
- The 3rd circle highlights a price action zone where there is a sharp reversal of price
- The 4th circle highlights a price action zone where price is sticky
- The 5th circle highlights the current market price of Cipla – 442.5
In the above chart all the 4 price action zones are around the same price points i.e at 429. Clearly, the horizontal line is below the current market price of 442.5, thus making 429 as an immediate support price for Cipla.
Please note, whenever you run a visual exercise in Technical Analysis such as identifying S&R, you run the risk of approximation. Hence always give room for error. The price level is usually depicted in a range and not at a single price point. It is actually a zone or an area that acts as support or resistance.
So going by the above logic, I would be happy to consider a price range around 426 to 432 as a support region for Cipla. There is no specific rule for this range, I just subtracted and added 3 points to 429 to get my price range for support!
Here is another chart, where both S&R have been identified for Ambuja Cements Limited.

The current price of Ambuja is 204.1, the support is identified at 201 (below current market price), and the resistance at 214 (above current market price). So if one were to short Ambuja at 204, the target, based on support can be at 201. Probably this would be a good intraday trade. For a trader going long at 204, 214 can be a reasonable target expectation based on resistance.
Notice in both the support and the resistance level, there at least 3 price action zone identified at the price level, all of which are well spaced in time.
Reliability of S&R
The support and resistance lines are only indicative of a possible reversal of prices. They by no means should be taken for as certain. Like anything else in technical analysis, one should weigh the possibility of an event occurring (based on patterns) in terms of probability.
For example, based on the chart of Ambuja Cements –
Current Market Price = 204
Resistance = 214
The expectation here is that if at all Ambuja cements starts to move up it is likely to <face a resistance at 214>. <Meaning, at 214 sellers could emerge who can potentially drag the prices lower. What is the guarantee that the sellers would come in at 214? In other words, what is dependence of the resistance line? Honestly, your guess is as good as mine.>
However, historically it can be seen that whenever Ambuja reached 214, it reacted in a peculiar way leading to the formation of a price action zone. The comforting factor here is that the price action zone is well spaced in time. This mean 214 stands as a time tested price action zone. Therefore keeping the very first rule of technical analysis in perspective i.e “History tends to repeat itself” we go with the belief that support and resistance levels will be reasonably honored.
Purely from my personal trading experience well constructed S&R points are usually well respected.
Optimization and checklist
Perhaps, we are now at the most important juncture in this module. We will start discovering few optimization techniques which will help us identify high quality trades. Remember, when you seek quality, quantity is always compromised, but this is a compromise that is worth making. The idea is to identify quality trading signals as opposed to identifying plenty, but worthless trades.
Optimization in general is a technique wherein you fine tune a process for best possible results. The process in this context is about identifying trades.
Let us go back to candlesticks patterns, maybe to the very first we learnt – bullish marubuzo. A bullish marubuzo suggests a long trade near the close of the marubuzo, with the low of the marubuzo acting as the stoploss.
Assume the following credentials for the bullish marubuzo:
Open = 432, High = 449, Low = 430, Close = 448
Hence the entry for the long trade is approximately at 448, with 430 as the stoploss.
Now what if the low of the marubuzo also coincides with a good time tested support? Do you see a remarkable confluence of two technical theories here?
We have a double confirmation to go long. Think about it on following terms:
- A recognized candlestick pattern (bullish marubuzo) suggests the trader to initiate a long trade
- A support near the stoploss price suggests the trader the presence of significant buying interest around the low
While dealing with a fairly random environment such as the markets, what a trader really needs is a well crafted trade setup. The occurrence of the above two conditions (marubuzo + support near the low) suggests the same action i.e to initiate a long trade in this case.
This leads us to an important idea. What if we had a checklist (call it a framework if you like) for every trade that we consider? The checklist would act as a guiding principle before initiating a trade. The trade should comply to the conditions specified in the checklist. If it does, we take the trade; else we just drop it and look for another trade opportunity that complies with the checklist.
Discipline, they say makes up for the 80% of the trader’s success. The checklist in my opinion forces you to be disciplined; it helps you avoid taking abrupt and reckless trading decision.
In fact to begin with we have the first two very important factors of the checklist:
- The stock should form a recognizable candlestick pattern
- Note: We have learnt some of the popular patterns in this module. To begin with you can use just these patterns to comply with checklist
- S&R should confirm to the trade. The stoploss price should be around S&R
- For a long trade, the low of the pattern should be around the support
- For a short trade, the high of the pattern should be around the resistance
Going forward in this module, as and when we learn new TA concepts, we will build this checklist. But just to quench your curiosity, the final checklist will have 6 checklist points. In fact when we have the grand 6 checklist points, we will weigh down each one of them. For example, checklist point number 4 may not be as important as point number 1, but nevertheless it is more important than 100 other factors that distract the trader.
Key takeaways from this chapter
- S&R are price points on the chart
- Support is a price point below the current market price that indicate 'buying interest'
- Resistance is a price point above the current market price that indicate 'selling interest'
- To identify S&R, place a horizontal line in such a way that it connects at least 3 price action zones, well spaced in time. The more number of price action zones (well spaced in time) the horizontal line connects, the stronger is S&R
- S&R can be used to identify targets for the trade. For a long trade, look for the immediate resistance level as target. For a short trade, look for the immediate support level as target.
- Lastly, comply with the checklist for optimal trading results
Comments
Post a Comment
Thanks for ypur precious response